Member management

Roster, join applications and member cards in one place

Import your roster from CSV or Join It, with company, category and any custom fields. Approve join and leave requests, and members sign in with an emailed code to show their card.

Who uses it:OwnersManagersStaffMembers & guests
What it does

Import your roster

Load a CSV from Join It, Excel or anything else. Columns are detected automatically; extra ones (address, birthday, employer…) become custom fields.

Join & leave requests

A web join form and resignation form. Requests queue for approval, and member numbers are assigned automatically.

Categories & companies

Categories such as regular, family or corporate, plus employer — which also links members to bonds and minimums.

Search & track

Search by name, number or company and export CSV. Chart joins, departures and headcount by category month by month.

How it flows

  1. 1Member / guest
    Apply to join

    Fill in the web join form: name, contact details and desired category.

  2. 2Office
    Approve the request

    Review it under Applications and approve. A member number is assigned and they join the roster.

  3. 3Automatic
    Welcome email

    An approval email goes out — you can check the wording before it's sent.

  4. 4Member / guest
    Sign in and show the card

    Sign in with a 6-digit code sent by email — no password needed.

  5. 5Staff
    Scan at the front desk

    Scanning the QR shows name, category and expiry instantly.

See the screens

Admin (office)

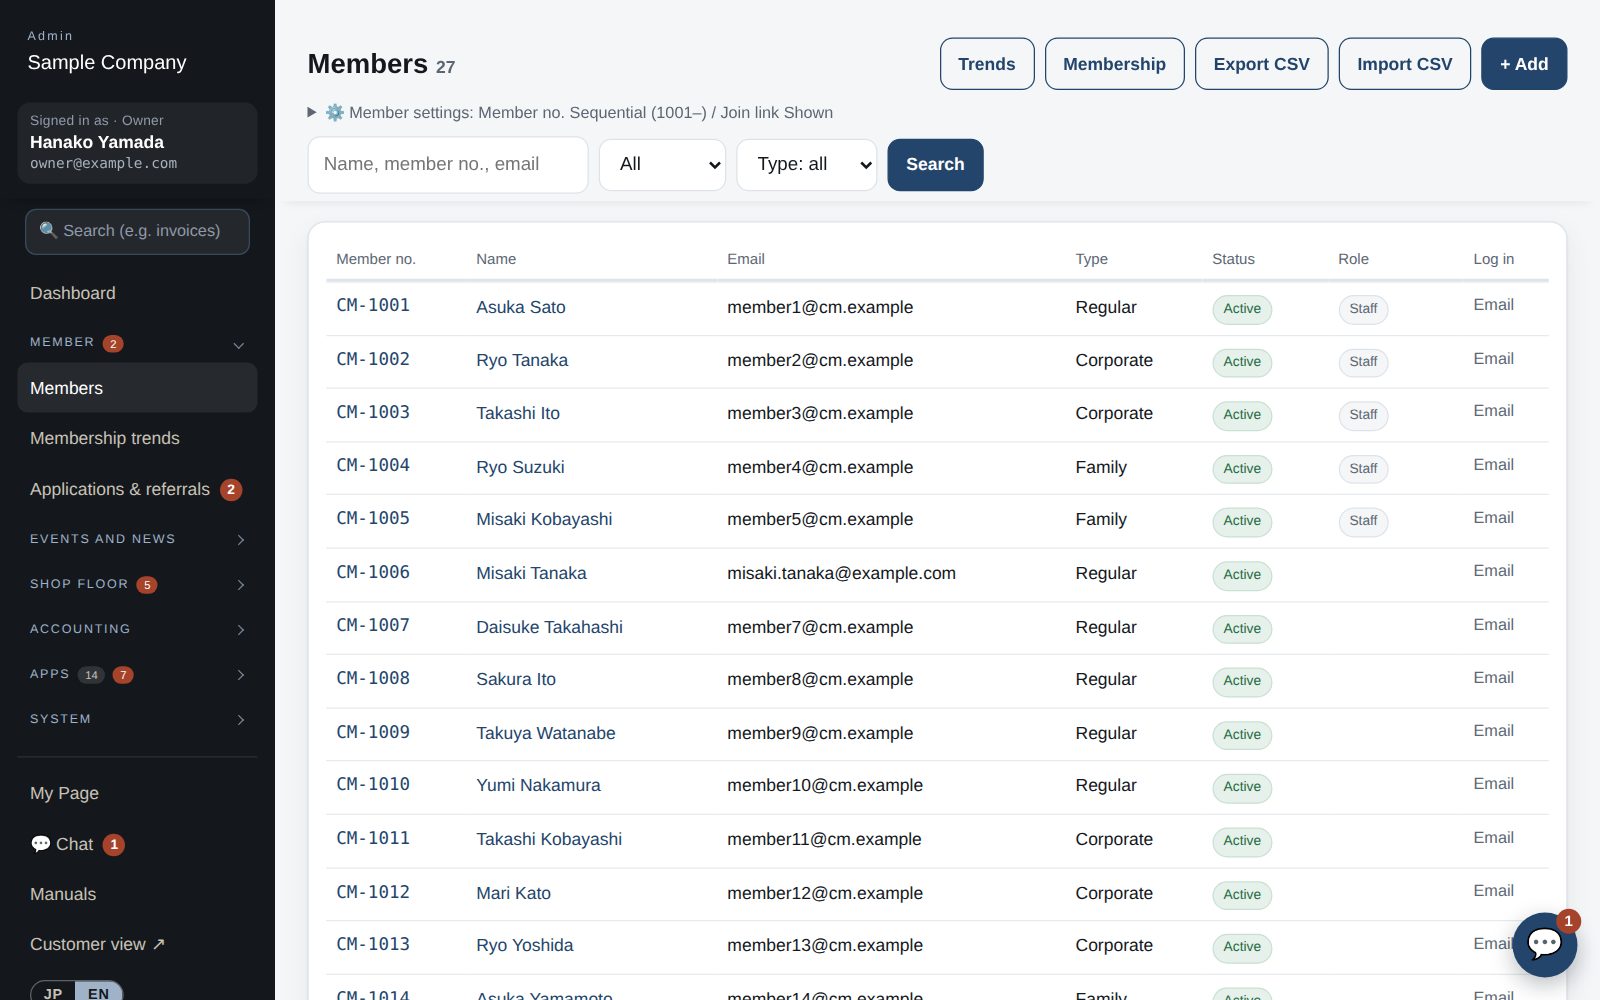
Member roster

Member roster

  1. Members → Roster: search and filter (active / pending / inactive). Add members by hand with “+ Add”, or load a CSV exported from Join It, Excel or any other roster with “Import CSV” (columns are detected automatically; people with the same number or email are updated, and blank cells never erase data).
  2. Columns the roster lacks (address, birthday, employer, etc.) automatically become “extra fields”. View and edit them on each member's page; they are included in “Export CSV”. Rename, reorder or delete them via “Edit fields” on a member's page (members themselves do not see them).
  3. Open a member to edit number, name, email, phone, category, status, join year and role (Member / Staff / Admin). The email address is the sign-in key, so keep it accurate.
  4. Each login email belongs to one member. When a person holds both a regular and a company membership (as its contact), or family members share an email, leave the second member's login email blank and put the address in “Contact email” (CSV / Join It import and join approval do this automatically). That person then sees the company membership's minimum and bond under their one login.
  5. A member's “Company” comes from Join It (also from a CSV “Company” column, or edit it on the member's page). Under Member categories choose the “Company member categories”; members in them are linked to their company's bonds and similar records by company name. With Join It connected, “🔄 Sync with Join It” at the top of the roster re-imports at any time (owners).
  6. “Withdraw” deactivates the member and blocks app sign-in. The record stays with the withdrawal date.
  7. Applications & referrals: new applications appear under “⏳ Awaiting approval” at the top, with the count in the left menu. “Approve and register” adds a pending member with a member number (set to Active once dues are settled). “Approve and end membership” ends it (automatically at the end of the requested month if later). Both show the email before sending, and you can choose not to send.
  8. On the same screen, set “Applications are emailed to” (owners if not set) and “Emails to customers” (approval texts for joining and leaving). Copy the application and withdrawal form URLs with “Copy”; for organizations without their own domain the URL includes the organization.
  9. Member numbers are assigned in sequence automatically (on approval, when adding and on import, if blank; set the prefix, first number or turn it off under “⚙️ Member settings” on the roster). Use “Assign numbers” above the roster for members without one. The card QR holds a per-organization code; reissue it with “Reissue QR” on the member’s page (the old QR stops working).
  10. Membership trends: monthly joins/leaves and headcount by category. Categories ticked “Exclude from total” (e.g. honorary) are left out of totals, charts and the dashboard count. CSV export is available.

Staff screens

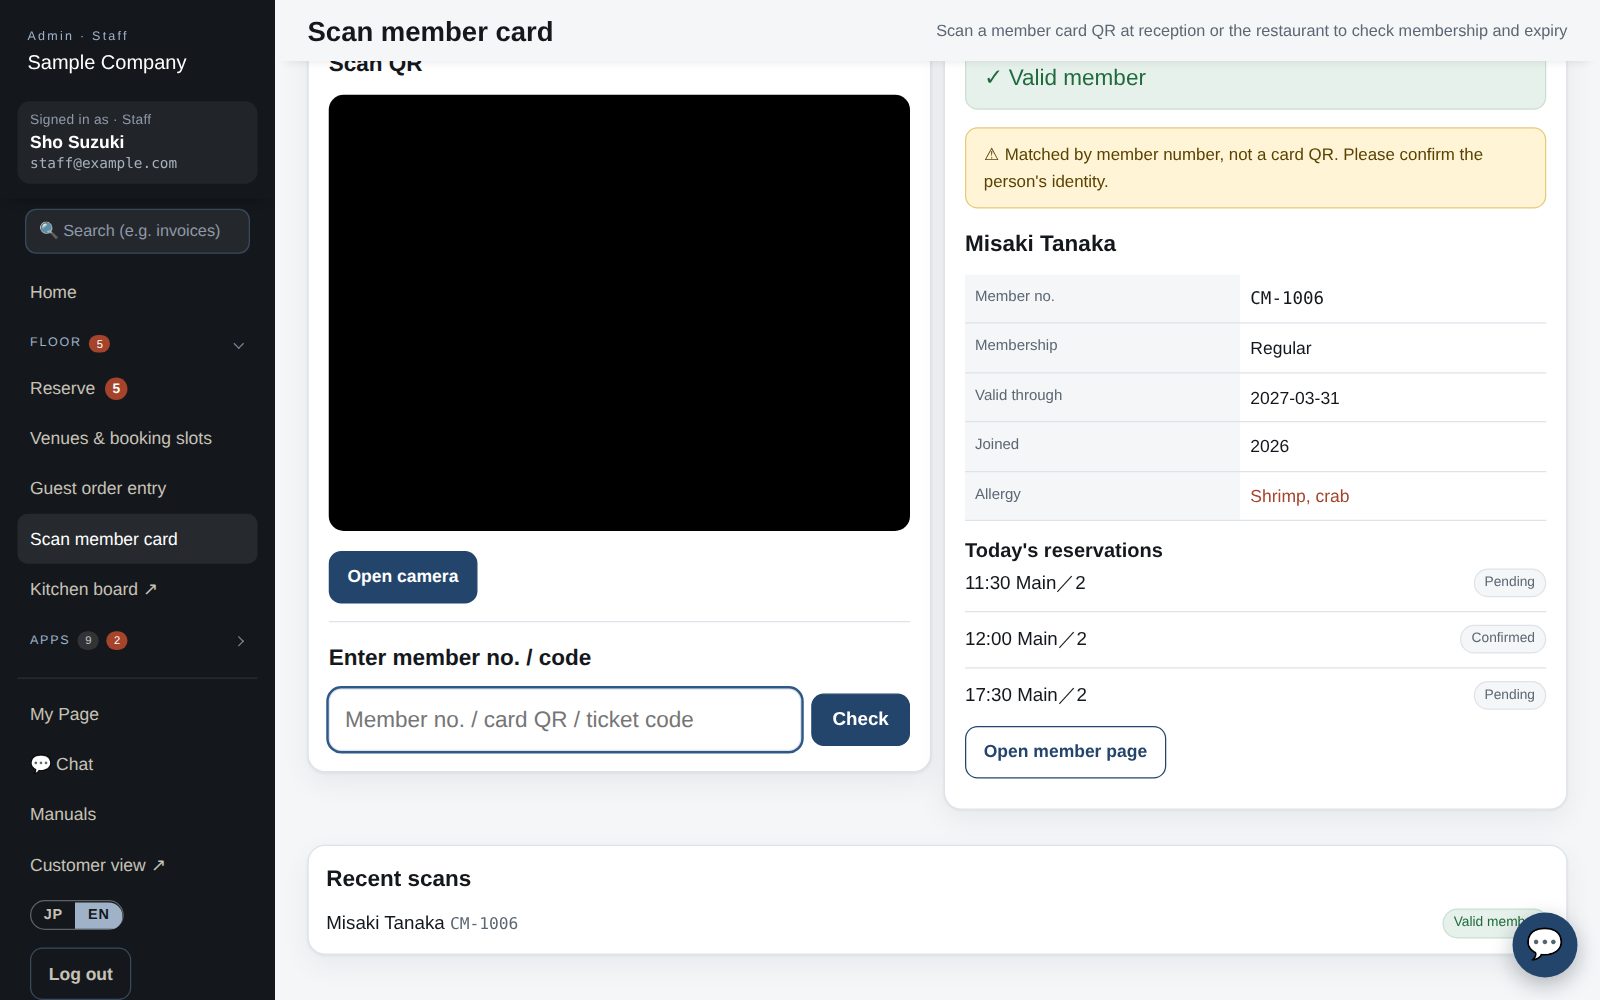
Office site: scan member card

Scanning member cards and event tickets

  1. App: My Page → Staff → “Scan QR”. The first time, allow camera access.
  2. In “Member card” mode, hold the card’s QR in the frame: name, number, category, expiry plus today’s RSVPs and reservations appear. Valid = green; expired or withdrawn = red.
  3. For event check-in, select today’s event in the mode row first. Scanning the ticket or member card marks the guest as checked in; scanning twice does not double count.
  4. If the QR will not scan, type the member number or ticket code in the field below and tap “Check”. The card QR includes the organization, so a card from another organization shows “belongs to another organization” and is not accepted. A QR containing only a number is not accepted either; type the number instead.
  5. Browser: Office site → Scan member card (/admin/scan). Event check-in is also under Events → “Check-in”.

Member app & web

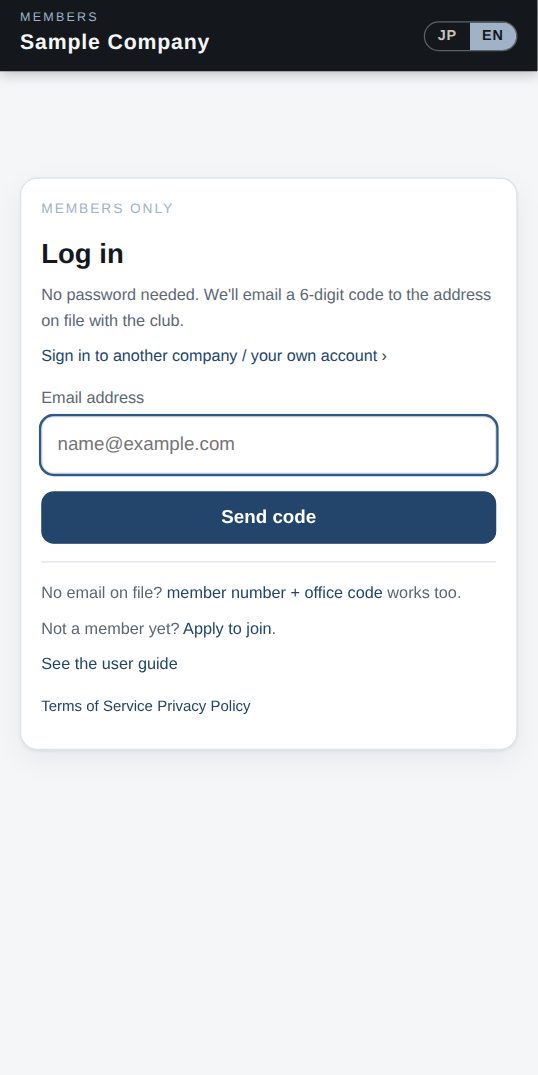
Sign-in (web)

Getting started: install and sign in

  1. Install “Nippon Club” from the App Store (TestFlight during the pilot) on iPhone or Google Play on Android. Without the app, the same features are available in a browser at nipponclub.cltny.com.
  2. There is no password. Enter the email address registered with the office; a 6-digit code is emailed to you. Enter the code (it expires in 10 minutes).
  3. If email is not available, use “Sign in with member number” with your member number and a code issued by the office.
  4. Once signed in, the app stays signed in. Switch the display language with JP / EN at the top right.
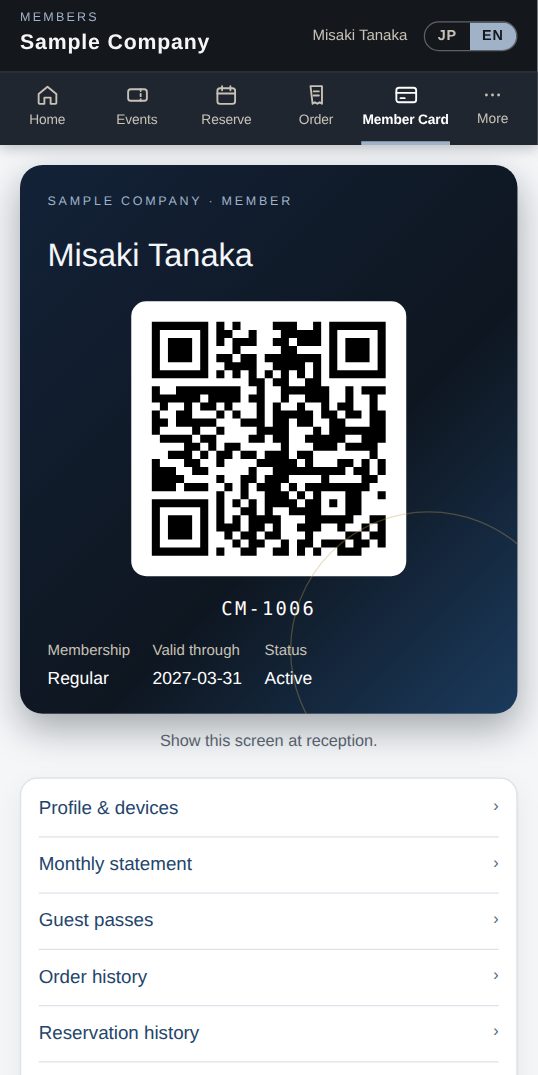
Digital member card (web)

Member card

  1. The Member Card tab shows your digital card: name, member number, category, expiry and a QR code.
  2. Show the QR to staff at reception or the restaurant. Scanning it confirms your membership and expiry.
  3. In the app the screen brightens automatically while the card is shown. Your plastic card remains valid.
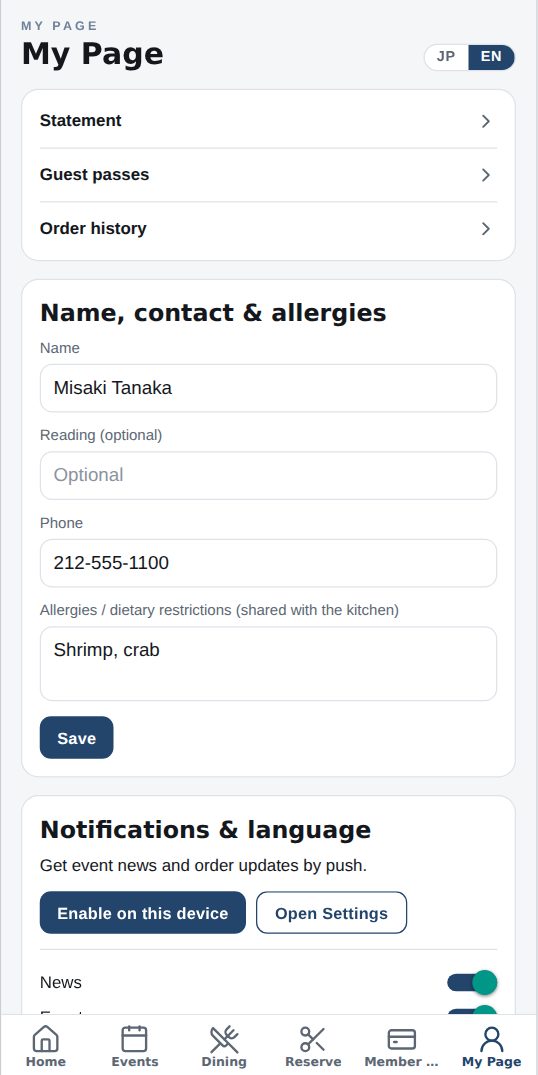
App My Page

My Page: contact, notifications, language

  1. Register your phone number and allergies / dietary restrictions; they are shared with the kitchen on every reservation and order.
  2. Tap “Receive on this device” to enable push notifications, then switch each type (news, events, restaurant, reminders) on or off.
  3. Switch the language here too. You can also require Face ID / Touch ID when opening the app (“Lock with biometrics”).
  4. To resign, use “Withdrawal request” to notify the office. Log out from this screen as well.

Works well with

Start with just the features you need. If nothing fits the way you work, we'll build it for you — free.

Get started →🎁 Get a custom app, free